Managed WebApp with CI/CD
The Managed WebApp with CI/CD starter project will provision a standard web application: ALB load balancer, AutoScalingGroup of web server(s) and an RDS MySQL database. This application has dev, staging and prod environments with a multi-account set-up. A CodePipeline deployment pipeline will build and deploy code to different environments based on your application’s git repo branch names. This is a managed application, with a CloudWatch agent to gather host-level metrics and central logs, a suite of CloudWatch Alarms to alert on metrics and a CloudWatch Dashbaord to assess overall performance.
Create a “Managed WebApp with CI/CD” Project
Install Paco and then get started by running the paco init project <your-project-name command.
Review the instructions on Getting Started with Paco to understand the importance of name
fields in Paco and the difference between a name and title. Then follow the instructions on creating
credentials for your project to connect it to your AWS Account.
Take a minute to set-up a PACO_HOME environment variable, this will save you lots of time typing.
This is a multi-account project template. The CI/CD will use cross-account permissions that are designed to be used in an account that is seperate from the accounts that they deploy into, so you will need at a minimum of two accounts. Review the Multi-account Setup instructions to understand how a multi-account set-up works with Paco.
After you’ve created a Paco project, connected it to your AWS master account and created child accounts, take a look at the Managing IAM Users with Paco docs. This template will start with only a single IAM User with Administrator access to all accounts. If you need to grant access to this Paco project to more than one person, or need to manage fine-grained access to different abilities across multiple accounts, then following this document is a must.
At this point you will have ran:
paco provision accounts
paco provision resource.iam.users
Finally return here to follow the instructions on customizing and provisioning the project!
Customize and Provision CloudTrail
This is an optional resource. CloudTrail is an AWS service which logs all changes to an AWS account. It is critical for securely managing accounts and can be extremely helpful in debugging why something broke when you have more than one person managing an account.
The CloudTrail file for this project is at resource/cloudtrail.yaml. It is configured to send
CloudTrail for every account into an S3 Bucket in the tools account. If you’re creating a more
security conscious set-up, you will want to create a dedicated security account and change the
s3_bucket_account field to direct CloudTrail there.
s3_bucket_account: paco.ref accounts.security
Also the CloudTrail will also be temporarily stored in a CloudWatch LogGroup for 14 days. You may want to disable that or make it longer. CloudWatch LogGroups are an easier way to search through your CloudTrail logs and you can also configure MetricFiters to alert you when events happen that can effect your AWS account security profile.
paco provision resource.cloudtrail
Customize and Provision SNS Topics
You will need to create SNS Topics if you plan on enabling and provisioning monitoring.
These SNS Topics contain SNS Subscriptions. Review the resource/snstopics.yaml file
and note that there is an admin group with one email subscription.
This group is configured to recieve any alarm notifications. You can add as many subscriptions to this group as you want. See the SNS Topics docs for examples of all protocols.
Also note that if you deployed in a region other than us-east-1 that your project will be configured to create a second SNS Topic in that region. This is because the Route 53 Health Check Service only works in that region. If you are not enabling HTTP health checks for your application, you can remove this region from your snstopics.yaml file.
Customize and Provision EC2 Key Pairs
You will need to create EC2 Key pairs in your dev, staging and prod accounts before you can launch EC2 instances in them. You can do this by running:
paco provision resource.ec2.keypairs
Make sure to save these keypairs somewhere safe, you will only see them once and need them for SSH access
to your servers. If you prefer to use your own key pairs, you can create them in the AWS Console and simply
edit the resource/ec2.yaml file and change the keypair_name field to match the name you gave your
own keypair in AWS.
Customize and Provision Route 53
You were asked to supply a domain name when creating this project. This domain name is in the
resource/route53.yaml file.
If you register a domain with the Route 53 service, it will create a Hosted Zone for you. When you provision the Route 53 file, it will create a new Hosted Zone:
paco provision resource.route53
After this runs, you will need to manually update the new Hosted Zone with the SOA (Start of Authority) and NS (nameservers) that are registered with your domain by AWS. Then you can remove the original Hosted Zone.
When you provision environments, the load balancers will add A Records to your HostedZone to automically enable your domain to be directed to the laod balancer.
You can also use a domain with another registrar. You will need to manually manage the A Records yourself in this case.
Customize and Provision CodeCommit
The CodeCommit docs describes your git repos and users in the resource/codecommit.yaml file.
This file will start with a single git repo and a single user. Each user will be a new IAM User that
only has permissions for that repo. It is possible to grant a normal Paco IAM User access to CodeCommit
repo’s but we recommend creating dedicated users through resource/codecommit.yaml as this limts the
blast radius if these credentials are leaked.
If you’ve got more than one developer, add them to the users: section and then create the repo and
users with:
$ paco provision resource.codecommit
Loading Paco project: /Users/username/projects/my-paco-project
 ...
Provision  tools       Create          Resource-CodeCommit-Git-Repositories
Run        tools       Hook            Resource-CodeCommit-Git-Repositories: : CodeCommitSSHPublicKey: post: create
tools:   Upload:  SSHPublicKeyId: you@example.com: APKA2......FPV2EAI
Be sure to save the AWS SSH key ID for each user. You can also see these keys in IAM in the AWS Console if you lose them.
Next, you will need to use the AWS Console to switch to the tools account that the CodeCommit repo was provisioned in and go to the CodeCommit service. You should see something like:

Copy the SSH Url and clone the repo with git clone <ssh-url>.
To authenticate when cloning the repo, each user can either add the AWS SSH key Id to their ~/.ssh/config file:
Host git-codecommit.*.amazonaws.com
  User APKAV........63ICK
  IdentityFile ~/.ssh/my_pubilc_key_rsa
Or if they are using their default public key, they can embed the AWS SSH key ID as the user in SSH Url:
git clone ssh://APKAV........63ICK@server/project.git
Create a Web Application with CodeBuild and CodeDeploy YAML files
This starting template is set-up to deploy a simple Python Pyramid web application although we will show you how to replace this with your own application.
Your application will need two files at in the top level directory:
- buildspec.yaml defines how the application is built using CodeBuild
- appspec.yaml defines how your application is deployed using CodeDeploy
If you want to see the example web application in action, after you provision an environment,
you will need to follow the README.txt for that application to create a MySQL database named
saas and run the database initialization scripts in /var/www/saas-app/ to pre-populate
the database.
Customize and Provision Environments
This project starts with three environments: dev, staging and prod. Each of these environments will be provisioned in a single region.
In the examples below, we will assume you named your NetworkEnvironment mynet and you chose
us-west-2 for your region.
You can provision an environment with:
paco provision netenv.mynet.dev
Customizing environments
Your netenv/mynet.yaml contains all the configuration for your environment, it’s network, applications
and other shared resources such as backups and secrets. Each top-level seciton will define the default
configuration. This is configuration only and is not used to create actual cloud resources.
The environments: section will then name these default resources in specific environments and regions.
This section controls what you want to actually provision in the cloud.
An environment has a default: section. This area allows you to override any base configuration.
Let’s see what starting overrides have been applied to the dev environment:
dev:
  title: "Development Environment"
  us-west-2:
    enabled: true
  default:
    secrets_manager:
      ap:
        site:
          database:
            enabled: true
    applications:
      app:
        enabled: false
        groups:
          bastion:
            resources:
              instance:
                instance_key_pair: paco.ref resource.ec2.keypairs.app_dev
          app_deploy:
            resources:
              pipeline:
                source:
                  codecommit:
                    deployment_branch_name: "master"
                build:
                  codebuild:
                    deployment_environment: "master"
          site:
            resources:
              alb:
                dns:
                  - domain_name: dev.example.com
                listeners:
                  https:
                    rules:
                      app_forward:
                        host: 'dev.example.com'
                      app_redirect:
                        enabled: false
              web:
                instance_key_pair: paco.ref resource.ec2.keypairs.app_dev
                monitoring:
                  enabled: false
              database:
                multi_az: false
First, you will have different instance_key_pair values for your EC2 instances. If you wanted
to share keypairs between your dev and staging environments, you could copy the values from your
staging environment into your dev environment.
Next, you have an Application Load Balancer (ALB) which is configured to redirect *.yourdomain.com to
yourdomain.com in your default prod configuration. In the dev environment this redirect is disabled
and the listener to forward to the TargetGroup that has your web servers has the host dev.yourdomain.com.
This exposes your dev environment at dev.yourdomain.com. You may not want to do this, however. Instead
you might want to rely on using the more obfuscated ALB DNS name directly. To change this, remove
the dns: and host: overrides:
dev:
  default:
    applications:
      app:
        groups:
          site:
            resources:
              alb:
                # remove DNS entry
                # dns:
                #  - domain_name: dev.pacosaas.net
                listeners:
                  https:
                    rules:
                      # remove this section setting the host
                      #app_forward:
                      #  host: 'dev.pacosaas.net'
                      app_redirect:
                        enabled: false
Beyond the scope of this starting template, but to make your non-prod envs completely private, you could also run a VPN service on the bastion instance and run the load balancer in the private subnets.
Finally you may want to customize your CI/CD. The starting template uses AWS CodePipeline together with CodeCommit, CodeBuild and CodeDeploy. Each environment will watch a different branch of the git repo stored in the CodeCommit repo.
- prod env <– prod branch
- staging env <– staging branch
- dev env <– master branch
These branch names are arbitrary. You might want to designate master as production, or even not have master deploy to any environents. These can be customized to suit whatever branching system you want to use in your version control workflow.
SSH to a Web Server and connect to MySQL
In your netenv/mynet.yaml you will have Security Groups defined in your network: configuration.
The SSH port for your bastion is open to all IP addresses. You may wish to restrict this to only specific
IP addresses to improve your security.
You can change the ingress: to be only your IP address:
bastion:
  instance:
    enabled: true
    egress:
      - cidr_ip: 0.0.0.0/0
        name: ANY
        protocol: "-1"
    ingress:
      - from_port: 22
        name: SSH
        protocol: tcp
        cidr_ip: 128.255.255.128/32
        #cidr_ip: 0.0.0.0/0
        to_port: 22
Then update your security groups. If you have already provisioned all three environments, you will need to update them all:
paco provision netenv.mynet.dev
paco provision netenv.mynet.staging
paco provision netenv.mynet.prod
If you don’t want to run your bastion host 24/7, you can disable it to save on your AWS costs. If you only want to disable it
for certain environments, customize the enabled: field in the environment section:
environments:
  dev:
    default:
      applications:
        app:
          enabled: true
          groups:
            bastion:
              enabled: false # add this line below the bastion: line
And run paco provision after changing this.
Also notice that your bastion has an EIP resource and an eip: field. This will provision an Elastic IP and attach
it to the bastion. If you start/stop the bastion, it will keep the same fixed IP address. If you don’t want to use this
feature, you can disable the EIP resource and remove the eip: field.
Once you are connected to your bastion, you can then connect to your web servers in your private subnets.
You will need to go to the EC2 service in the AWS Console to see what the private IP address of a web server is.
In order to avoid having to copy your SSH private key to the bastion server, you can use the SSH ProxyCommand
to connect directly to the web server from your own computer. Edit your ~/.ssh/config file and add:
Host myweb-dev
  Hostname 10.0.0.100 # <-- private IP of a web server
  User ec2-user
  IdentityFile ~/.ssh/myweb-dev-us-west-2.pem # <-- path to your private SSH key
  # replace the path to your private SSH key and your bastion public EIP (or dynamic public IP)
  ProxyCommand ssh -i ~/.ssh/myweb-dev-us-west-2.pem ec2-user@128.255.255.128 -W %h:%p
Now you can simply run:
$ ssh myweb-dev
Note that the web servers are in an AutoScalingGroup. This means instances will be replaced if they become unhealthy, and new web servers will have different private IP addresses. You will need to change your Hostname IP after this happens.
Once you are on the web server, try connecting to your MySQL database. You will need the endpoint of the RDS database
and the password from Secrets Manager. You can find these in the console, or if have the get_rds_dsn.sh script
installed, you can run it too see this from the server:
$ ssh myweb-dev
$ sudo su
# /tmp/get_rds_dsn.sh
# mysql -h ne-wa-staging-app-ap-site-database-rds.c1aqauvngpug.us-west-2.rds.amazonaws.com -u root -p
Enter password:
Welcome to the MariaDB monitor.  Commands end with ; or \g.
...
MySQL [(none)]>
Customize your Web Server to support your web application
CloudFormation Init is is a method to configure an EC2 instance after it is launched. It’s a much more complete and robust method to install configuration files and pakcages than with a UserData script.
If you look at your project’s netenv/mynet.yaml file in the applications: section you will see
a web: resource that defines your web server AutoScalingGroup. There is a cfn_init: field for
defining your cfn-init configuration.
launch_options:
    cfn_init_config_sets:
    - "Install"
cfn_init:
  parameters:
    DatabasePasswordarn: paco.ref netenv.wa.secrets_manager.ap.site.database.arn
  config_sets:
    Install:
      - "Install"
  configurations:
    Install:
      packages:
        yum:
          jq: []
          httpd: []
          python3: []
          gcc: []
          httpd-devel: []
          python3-devel: []
          ruby: []
          mariadb: []
      files:
        "/tmp/get_rds_dsn.sh":
          content_cfn_file: ./webapp/get_rds_dsn.sh
          mode: '000700'
          owner: root
          group: root
        "/etc/httpd/conf.d/saas_wsgi.conf":
          content_file: ./webapp/saas_wsgi.conf
          mode: '000600'
          owner: root
          group: root
        "/etc/httpd/conf.d/wsgi.conf":
          content: "LoadModule wsgi_module modules/mod_wsgi.so"
          mode: '000600'
          owner: root
          group: root
        "/tmp/install_codedeploy.sh":
          source: https://aws-codedeploy-us-west-2.s3.us-west-2.amazonaws.com/latest/install
          mode: '000700'
          owner: root
          group: root

      commands:
        10_install_mod_wsgi:
          command: "/bin/pip3 install mod_wsgi > /var/log/cfn-init-mod_wsgi.log 2>&1"
        11_symlink_mod_wsgi:
          command: "/bin/ln -s /usr/local/lib64/python3.7/site-packages/mod_wsgi/server/mod_wsgi-py37.cpython-37m-x86_64-linux-gnu.so /usr/lib64/httpd/modules/mod_wsgi.so > /var/log/cfn-init-mod_wsgi_symlink.log 2>&1"
        20_install_codedeploy:
          command: "/tmp/install_codedeploy.sh auto > /var/log/cfn-init-codedeploy.log 2>&1"

      services:
        sysvinit:
          httpd:
            enabled: true
            ensure_running: true
            commands:
              - 11_symlink_mod_wsgi
          codedeploy-agent:
            enabled: true
            ensure_running: true
There is a lot of configuration here. First, the launch_options: simply tells Paco to inject a script into your UserData
that will ensure that cfn-init is installed and runs your cfn-init configuration.
Next, the parameters: section is the only section that doesn’t map to cfn-init config. It’s used to make configuration
parameters available to be interpolated into cfn-init files. These can be static strings or references to values created by
resources provisioned in AWS.
The packages: section is simply a list of rpm packages.
The files: section is a list of files.The content of this file can be defined either as a content_cfn_file:
which will be interpolated with CloudFormation Sub and Join functions, or a static non-interpolated with the
content_file: field, or simply in-lined with the content: field.
You can see that for the example Python Pyarmid application, there is custom WSGI configuration used with the Apache web server. There is also a script to install the CodeDeploy agent. You will need this CodeDeploy agent installed and running to work with the CI/CD regardless of what application you deploy.
The get_rds_dsn.sh file is an example of interpolating the ARN of the provisioned RDS MySQL database into a file on the filesystem.
It also shows you the command to run to get the secret credentials to connect to your database. Note that there is an IAM Role created
for this instance when it is connected to the secret by the secrets: field for the ASG that allows access to only the listed secrets.
The commands: section runs shell commands in alphanumeric order. You can customize the mod_wsgi commands, but again leave the
command to install the CodeDeploy agent.
Finally the services: section is used to ensure that services are started and remain running on the server. Again,
you might want to replace Apache (httpd) with another web server, but will want to leave CodeDeploy as-is.
Working with Regions
When you provision an environment, you can also specify the region:
paco provision netenv.mynet.dev.us-west-2
If you look at your netenv/mynet.yaml file you will see an environments: section at the bottom
of the file:
environments:
  dev:
    title: "Development Environment"
    us-west-2:
      enabled: true
  default:
Let’s say that you wanted to also have a development environment in eu-central-1 for your European developers. You can simply add a second region:
environments:
  dev:
    title: "Development Environment"
    us-west-2:
      enabled: true
    eu-central-1:
      enabled: true
  default:
The first time you make a new region available, you will want to add it to your project.yaml file:
name: my-paco-project
title: My Paco
active_regions:
  - eu-central-1
  - us-west-2
  - us-east-1
You will also need to provision any global support resources for that region, such as SNS Topics and EC2 Key pairs.
Then you can provision into that region:
paco provision netenv.mynet.dev.eu-central-1
Now when you run provision on the environment, it would apply changes to both regions:
paco provision netenv.mynet.dev # <-- applies to both us-west-2 and eu-central-1
Monitoring an environment
To start, monitoring is only enabled for the prod environment. You may wish to enable your monitoring
for your other environments, but this will add a small amount to your AWS bill from CloudWatch.
Monitoring is enabled/disabled with the enabled: field under the monitoring: configuration.
site:
  resources:
    alb:
      monitoring:
        enabled: true # changed from false
      dns:
        - domain_name: staging.example.com
      listeners:
        https:
          rules:
            app_forward:
              host: 'staging.example.com'
            app_redirect:
              enabled: false
    web:
      instance_key_pair: paco.ref resource.ec2.keypairs.app_staging
      monitoring:
        enabled: true # changed from false
    database:
      multi_az: false
      monitoring:
        enabled: true # changed from false
    dashboard:
      enabled: true # changed from false
With monitoring enabled you will have:
- CloudWatch Alarms for your Application Load Balancer, web server AutoScalingGroup and RDS MySQL.
- CloudWatch Agent which runs on your web servers to collect logs and in-host metrics.
- CloudWatch Log Groups to collect os, ci/cd and application logs.
- Cloudwatch Log Group metric filters to gather metrics on errors in logs.
- CloudWatch Alarms to alert you when your logs have errors.
Note that when you enable/disable monitoring, this will change the CloudWatch agent installation configuration for your web servers. This will cause AWS to terminate your existing web servers and launch new instances.
From the AWS Console you can visit the CloudWatch service to see your Alarms:
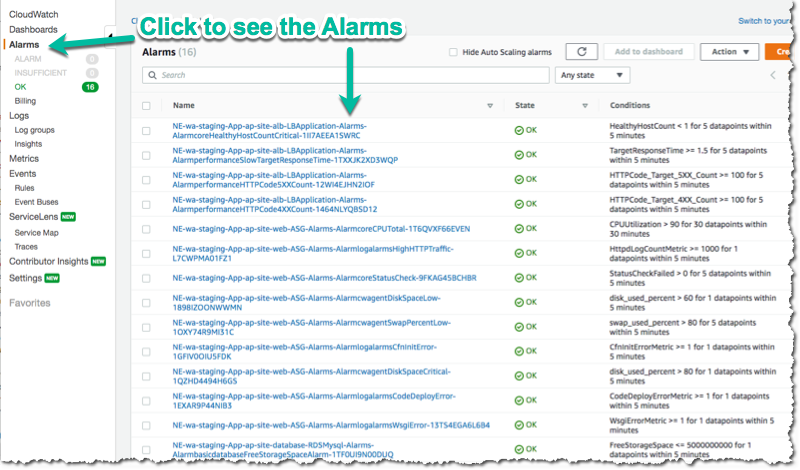
The alarms are all contained in the monitor/AlarmSets.yaml file. You also may wish to remove certain alarms
or add new ones - customizing alarms and the thresholds is very specific to the application you are
running and it’s traffic.
If you want to see how your application’s resources are performing overall, take a look at the CloudWatch Dashboard that was provisioned when you enabled monitoring:
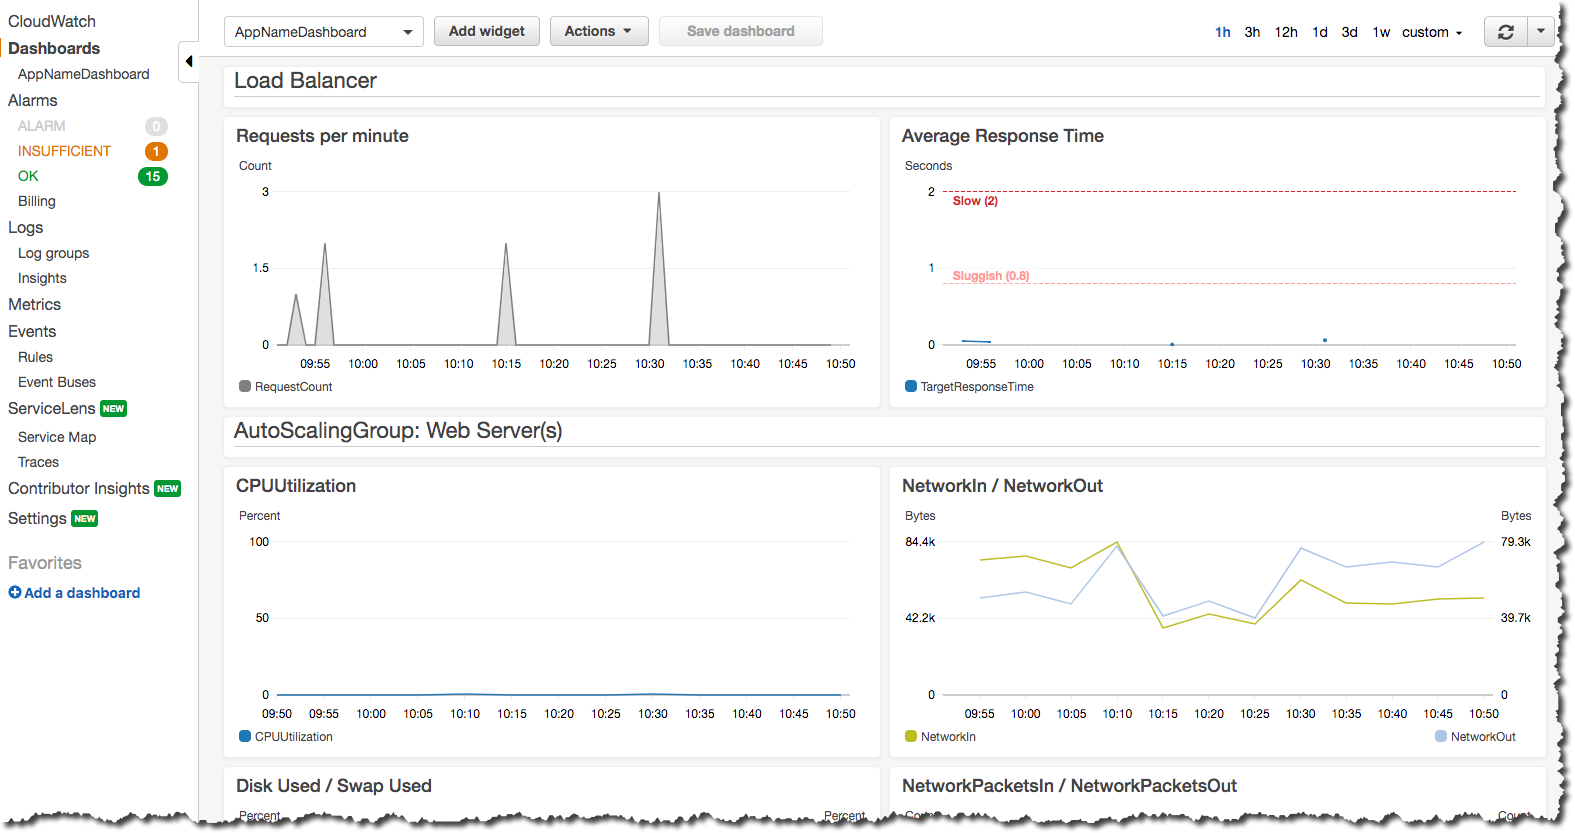
Here you can see graphs of some metrics for your Load Balancer, web server AutoScalingGroup and RDS MySQL database. Again, this is only a basic selection of some of the metrics available - it is common to customize this to be specific to your application.
You can change this Dashboard directly in the AWS Console, but these Dashboard settings are
controlled by a configuration file at netenv/dashboards/complete-dashboard.json and can be restored to
the original settings with subsequent paco provision commands. Instead, when viewing the Dashboard choose
“Actions –> Save dashbaord as …” and create a copy of this Dashboard, then make manual customizations.
It’s also possible to choose “Actions –> View/edit source” and put the JSON configuration for a Dashboard into your project’s configuration. Note that you will need to replace the hard-coded region and resource ids with placeholders to be dynamically interpolated when the Dashboard is created.
The configuration for your starting Dashboard looks like this:
dashboard:
  type: Dashboard
  enabled: true
  order: 200
  title: AppNameDashboard
  dashboard_file: ./dashboards/complete-dashboard.json
  variables:
    ApplicationTargetGroup: paco.ref netenv.mynet.applications.app.groups.site.resources.alb.target_groups.app.fullname
    LoadBalancerName: paco.ref netenv.mynet.applications.app.groups.site.resources.alb.fullname
    WebAsg: paco.ref netenv.mynet.applications.app.groups.site.resources.web.name
    DBInstance: paco.ref netenv.mynet.applications.app.groups.site.resources.database.name
Feel free to change the title: field - but remember that CloudWatch Dashboards can only contain alphanumeric characters.
Finally, take a look at your monitor/Logging.yaml file. Here you will see the log files that are collected.
You will most likely want to keep the rpm_linux and cloud logs as-is. Take a look at the Metric Filters
for the cloud logs:
cloud:
  # cloud logs specific to configuration and operation in AWS
  log_groups:
    cfn_init:
      sources:
        cfn_init:
          path: /var/log/cfn-init.log
          log_stream_name: "{instance_id}"
      metric_filters:
        CfnInitErrors:
          filter_pattern: '"[ERROR]"'
          metric_transformations:
            - metric_name: 'CfnInitErrorMetric'
              metric_value: '1'
    codedeploy:
      sources:
        codedeploy:
          path: /var/log/aws/codedeploy-agent/codedeploy-agent.log
          log_stream_name: "{instance_id}"
      metric_filters:
        CodeDeployErrors:
          filter_pattern: '" ERROR "'
          metric_transformations:
            - metric_name: 'CodeDeployErrorMetric'
              metric_value: '1'
These Metric Filters apply a filter pattern to every log line ingested. If they match the pattern, they will send a metric value to CloudWatch. There are special LogAlarms in your AlarmSets.yaml file to watch for these metrics and notify on them:
# CloudWatch Log Alarms
log-alarms:
  CfnInitError:
    type: LogAlarm
    description: "CloudFormation Init Errors"
    classification: health
    severity: critical
    log_set_name: 'cloud'
    log_group_name: 'cfn_init'
    metric_name: "CfnInitErrorMetric"
    period: 300
    evaluation_periods: 1
    threshold: 1.0
    treat_missing_data: notBreaching
    comparison_operator: GreaterThanOrEqualToThreshold
    statistic: Sum
  CodeDeployError:
    type: LogAlarm
    description: "CodeDeploy Errors"
    classification: health
    severity: critical
    log_set_name: 'cloud'
    log_group_name: 'codedeploy'
    metric_name: "CodeDeployErrorMetric"
    period: 300
    evaluation_periods: 1
    threshold: 1.0
    treat_missing_data: notBreaching
    comparison_operator: GreaterThanOrEqualToThreshold
    statistic: Sum
These alarms will alert you if your instance has errors during the CloudFormation Init launch configuration, or if the CodeDeploy agent has errors during a new application deployment. These can be very helpful at letting you know your CI/CD set-up has gone off the rails.
There are similar alarms for the example Python Pyramid application. These are under the “# application specific logs” comment in Logging.yaml and in AlarmSets.yaml for the alarms named WsgiError and HighHTTPTraffic. You will want to customize these logs and alarms to whatever web server and application-specific logs you have in your web server set-up.
Backup and Restore
This project also has a BackupVault that will make daily database backups on the prod database.
You can already take advantage of RDS’s built-in automatic backups to create snapshots. However, AWS also provides AWS Backup as a centralized location to do backups. The advantage of using this service to back-up your database is you can retain backups longer than 35 days, you can transition older back-ups to S3 Glacier and if you can have several backup schedules (e.g. daily, weekly and monthly) with different lifecycle policies.
The netenv/mynet.yaml has a backup_vaults: section that looks like:
backup_vaults:
  app:
    enabled: false
    plans:
      database:
        title: RDS Backups
        enabled: true
        plan_rules:
          - title: Daily RDS backups
            schedule_expression: cron(0 7 ? * * *)
            lifecycle_delete_after_days: 30
        selections:
          - title: RDS Daily Backups Selection
            tags:
              - condition_type: STRINGEQUALS
                condition_key: Paco-Application-Name
                condition_value: {{cookiecutter.application_name}}
              - condition_type: STRINGEQUALS
                condition_key: Paco-Application-Group-Name
                condition_value: site
              - condition_type: STRINGEQUALS
                condition_key: Paco-Application-Resource-Name
                condition_value: database
              - condition_type: STRINGEQUALS
                condition_key: paco.env.name
                condition_value: prod
This will be overridden only in the prod environment to turn on enabled: true. The backup selection is
configured to use tags to select resources to backup. This can be helpful if you want to have a whole
group of things backed up without needing to remember to adjust your backup selections. For example, if
you had multiple databases, you could put them all into the same Resource Group named persistence and
select that group. If you added a new database, it would automatically be included in the backup selection.
Paco automatically applies a standard set of Tags to all resources it creates. Every Paco resource is located in a hierarchical tree in this order:
- NetworkEnvironment: A shared collection of environments
- Environment: A complete set of working resources, e.g. dev, staging and prod
- Application: An application within an environment, e.g. wordpress or saas-app
- Resource Group: A group of resources to support an environment. Helpful to seperate CI/CD resources from app resources, for example.
- Resource: A specific conceptual resource. Sometimes this can be more than one actual AWS Resource, such as a Lambda and a Lambda Permission.
Your prod RDS database will have these Tags:
paco.netenv.name: mynet
paco.env.name: prod
Paco-Application-Name: app
Paco-Application-Group-Name: site
Paco-Application-Resource-Name: database
Alternatively there is a resource: field for selections that can be used to specify a specific resource
with a Paco reference. Using this field will ensure that you have correctly chosen a real resource - if there
is a typo, Paco will warn you when it loads your Paco project configuration. Otherwise if you are using tag-based
selections, you are recommended to review your BackupVault in the AWS Console and ensure it’s working correctly.
selections:
  - title: RDS Daily Backups Selection
    resource: paco.ref netenv.mynet.applications.app.groups.site.resources.database.name